Showing posts with label Crafty ideas. Show all posts

Thursday, November 8, 2012

Thankful


Grace (6) created a thankfulness tree in Children's Church on Sunday.  Each child picked several "leaves" to glue onto the tree from what the teacher had prepared, and Grace picked the likely things to be thankful for--God, home, health, friends, peace, family, pets, food...


Each child was also given the chance to write another thing he or she was thankful for.  Grace wrote,

"LONG HAIR THANCK YOU GOD FOR LONG HAIR"


She sounds so...emphatic.  I'd say she really likes having long hair, wouldn't you? 

Wednesday, October 12, 2011

Works for Me Wednesday: Magnets

Yes, magnets.

One day this week, while sitting with my 9 year old so that he would remain sitting at the table working diligently on his math assignment (ahem), I decided to make my refrigerator look a little better.

I started with making a new homemade "dry erase" surface to record leftovers, kitchen projects that need to be completed, etc.   (Here is my old one mentioned in a previous blog post.)  I found prettier paper than I had been using and covered it with some laminating paper my aunt had given us years ago.  This time, I wrote not only the days of the week along the side, but also a space to record the time I started the crock pot before I laminated the paper; the rest is erasable. I also now have prettier magnets because...


My next project was to cover some of those advertising magnets you receive from businesses.  I started with covering one magnet that I've been setting my magnetic kitchen timer on.  The refrigerator surface was getting scuffed from the constant movement of the timer (Does anyone else have kids with a fascination with timing everything?) and I had placed one of those ad magnets behind it...but it wasn't pretty.  Now, with some paper and a little glue, it is.


 Then I got a little carried away with other advertising magnets and smaller magnets...


Grace (5) was so impressed with my work that she said it looked like a company had made them.  ;)

~~~~~

This is something we don't use anymore, but it saved a lot of headaches and arguments for us a few years ago when we first began allowing Robert to "roam the neighborhood" on his own to visit his friends.  After he had permission to go to a friend's house and we had told him what time to return, he would write the information on a piece of paper that was held by this magnet (under "GOING TO:" and "BACK AT:" at the base of the magnet).  This was a simple solution to keep him accountable--and there was no discussion of "But I thought you said..." because he wrote it himself, and he typically wrote the time on his hand right then since he already had a pen handy.  (This was another advertising magnet that I had covered years ago.)


What works for you?


Wednesday, July 27, 2011

WFMW: Sew much fun!


Since I obviously haven't been blogging lately, what have I been doing?

You mean besides searching eBay, Amazon.com, and HomeschoolClassifieds.com (and a few other sites) for the last remaining school books we needed for the rapidly-approaching 2011-2012 school year?

I've been sewing.

Years ago, I ran across an old bed sheet (the tag says 1978) that was in perfect condition. I kept it because, even back then, I imagined using the sheet to make some cheerful-looking curtains. Well, I finally did it! Presenting...

My new laundry room curtains!


Jason's first words? "Woah! Those are...some curtains!" Hey, they're behind the door in my laundry room and I'm likely to be the only person in this house who sees them for more than five seconds. Nobody else has to like them. :)

The sheet was in great condition and the gingham print made it very easy to make precise, straight lines. Oh, and I left the "1978" tag on my new curtains...well, just because.


There is more than enough of the bed sheet left over to make Grace a dress from it. (She asked.) Hopefully that won't take as long to get around to doing. ;)

For more details on sewing curtains using bed sheets, check out this post where I made curtains for our French doors.

~~~

What else have I been sewing? "Bean bags" for a bean bag toss game! Inspiration for this idea struck after going to my sister- and brother-in-law's home and they had a new bean bag toss game in the back yard. I (eventually) thought of this structure

February 2009
Left to right: Robert (11), Grace (2), and Josiah (6)


which no longer looks anything like that because two sides were damaged with holes. Still, there are two sides of the playset that are in great condition, and these are the sides with the round holes which would be great for a bean bag toss game, right?

Of course they would! This is what Josiah (a.k.a. Josiah the Builder) came up with to secure the two functional pieces together:


I was thinking of looping rope through those holes at the top, but I guess metal stakes would work just as well.

Ahem.

I looked through my little box of fabric and found some pieces of Jason's old work pants in two different colors for two "teams." I sewed to make three closed sides


and turned it right side out.


Instead of the more expensive plastic "beans" you can find at Michaels, I put about 2/3 cup of uncooked rice in a ziploc bag


and folded the bag to fit inside the cloth so that the rice would be protected from moisture, dirt, mud, bugs, etc.


I pinned the remaining side
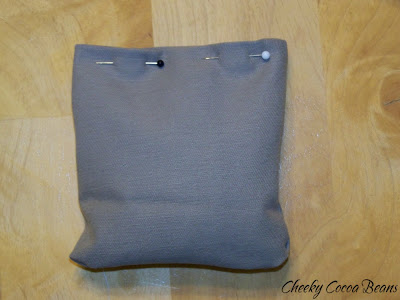

and carefully sewed the last side shut, taking care to avoid sewing the plastic bag.


I could have sewn the bags closed with matching thread but these will be sitting in the dirt. I'm not as picky about things that will be sitting in the dirt.

I made sets of bean bags for Josiah (9) and Grace (5) to play with inside, too. Josiah practiced his running stitch with some of these.

Grace wanted to learn to sew, too, so at first I was letting her practice handling pins at the table while I was there sewing with the sewing machine--she practiced running pins in and out of a scrap piece of cloth. Next, I let her loose with a threaded needle and a scrap piece of cloth, and she stuck herself with the needle less often than Josiah did. When she was done, Josiah saw her work and commented, "Wow! She's really good at making BIG stitches!" :) He's such a good brother--there truly wasn't even a hint of sarcasm in that. But there were some really BIG stitches.

Grace persisted with wanting to sew, so I drew some small dashes on another scrap piece of cloth and showed her how to cover up the dashes with her stitches. She did a great job! She can be pretty precise when she wants to be. Future seamstress in the making? Hmmm...


Sunday, January 2, 2011

Using bed sheets to make curtains

We have lovely French doors that go from our kitchen to the back yard. They are lovely but cold in the winter, and terribly hot in the summer as they let all the hot afternoon sun into the kitchen. After living in this house for 11 years now, I finally decided to do something about covering the French doors...besides using white bath towels during the summer, that is.

Yes, very classy.

My main problem was that standard curtain rods are too long to fit over the windows. It appears the previous owners did not measure realize this, and they installed the hardware on the door before seeing that the rod would not fit. (This hardware is what we have been hanging towels on using safety pins, so it has not gone to waste.) Also, once you go beyond "standard," you tend to get into "decorative," and "decorative" = "expensive." I didn't want to spend much money on something that at least one child was bound to swing on at some point...hence, the towels.

Until last month, when I decided once and for all that I was going to cover those windows with something, even if it was a bed sheet or two, or three. I searched online at Target.com and found swivel sash rods that were short enough to cover each window area, and they were only $2.49! Whoo hoo!


I bought up two white flat sheets at Goodwill, along with a queen-sized light sage green flat sheet to help camouflage the slight differences in the white sheets as well as to block out more sun during the summer. (Incidentally, the two white flat sheets were different sizes--one a twin and one a double--which slightly bothered me but hasn't really made a difference...which was really good since I couldn't find any other gently used white flat sheets.)

The bottoms of both flat sheets became the "top" since they had identical bottoms for the curtain rod to go through. I cut the sage sheet in half, to use one half behind each of the white curtains. I hemmed the flat sheets to a good length, leaving the sage sheet about an inch shorter than the white sheets. If you would like detailed instructions on how to make curtains out of bed sheets, you can click here to read one method.

And, yes, Brenda, I finally used my sewing machine for this sewing project! Not too shabby stitching for someone who hasn't used a machine in more than 20 years. ;)


Now the problem of what to do with the sage curtain backing...

Since the swivel rod didn't leave any room to work with behind the rod, I couldn't just sew the sage curtains to the back of the white curtains. My original idea was to tack the sage curtain to the back of the white curtain just underneath the part hanging from the rod. I finished one panel completely (TEDIOUS, especially since I was working with two different sized panels)


and then spent most of a day thinking how I didn't like the way it looked.


OK...onto Plan B. I decided to try stringing elastic through the top of the sage curtain panel in a loop and then hang that (tied as tightly as possible) over the hardware before replacing the rod with the white curtain.

It sagged, of course,


which I was expecting, so I pinned it up to the top portion of elastic in two places. It still sagged,


so I pinned the sage curtain to the underside of the white curtain in several places...


and that (FINALLY) worked! (The left side of photo is the successfully finished curtain panel; the right side was still waiting to be fixed.)


With the piece of sage sheet that I cut off, I made a simple sash for each side:


So, I finally have curtains for our French doors! And that works for me! I really like that I can wash each piece separately, which was something I was concerned about when I was tacking the two panels together. Now? No problem!


You know what else works for me? With my sewing project, Josiah (8) has a sudden and extreme interest in sewing. He has mended holes in two pair of his sweatpants and a t-shirt, and is hungry to learn more. Last night he started sewing a scarf for Grace (4) using strips of colorful rags, too.


It was the sewing machine that sparked his interest. I think he figures the sooner he learns sewing by hand, the sooner I'll let him use the sewing machine! Still, I will totally use his new interest in sewing to help all of us ease into school next week. I want all of my kids to at least know how to mend a hole, to sew on a button, and to hem. The first few days of school after Christmas break seems like the perfect time to tackle that!

Are you thinking of using bed sheets to make curtains for your home?  If so, for which room?  Will you use a solid colored sheet or one with a pattern?


Click here to see my other WFMW posts.

Saturday, January 1, 2011

If only it could always be this easy

Grace (4) came running into the room to find me. Tears were streaming down her cheeks, and she was sobbing so hard she could hardly tell me that her Dollar Tree horse-on-a-stick had been stepped on and the plastic pole was smashed.

I held her, stroked her hair...and remembered the brightly colored rolls of Christmas packing tape that I'd just bought because they were marked down to $.50 each at Staples.


I asked Grace if she wanted to pick one of those designs for her horse and I would fix it. She smiled, and picked out the red and white stripes. She excitedly told me that her horse loved her new candy cane dress,

and that her other horse wanted a polka dotted dress.

Of course.

She was delighted with her horses' new dresses


and they were, too.

Sunday, May 2, 2010

Gran'dad is this many...

A few years ago, I ran across a gift idea in a Family Fun magazine and made it for my dad's 67th birthday. The original idea was to use kids' handprints to make a "Gran'dad is this many..." shirt, with the kids' fingers representing the number of years. I thought something along the lines of this formula:


(fabric paint + bathroom sink + not enough scrubbing + bathroom towels) x 3 kids = huge mess for Mom

so I modified the idea a bit. I decided to trace each child's hand and use fabric paint to outline the handprints on the t-shirt.


On Saturday, we celebrated Dad's 70th birthday (as well as some of the other May birthdays in the family, like my son Robert, who will be 13 in just a few more days). I decided to make this t-shirt for his birthday again.

Step 1: Trace each child's hand. I traced the patterns onto cardstock to make them sturdier. (Plus, I can write the date on these and keep them in case I ever want to know exactly when Robert's hands grew larger than my own...April 2010.)


Step 2: Wash and dry the t-shirt before beginning your work. This might be a good time to make enough "handprints" of the appropriate sizes so you can lay them all out on the shirt to know the exact placement.

Step 3: Let each child choose the color of paint for his or her handprints.

Step 4: Convince your daughter that purple would be a lovely color for her handprints. We had 14 handprints that needed to go on a medium t-shirt, so I knew I would use a lot of Grace's handprints; I figured my dad wouldn't really want that much pink on his t-shirt. ;)

Step 5: Place a large piece of cardboard, layers of newspaper, or anything else that works inside the t-shirt, just to make sure nothing bleeds through. (I also place the whole t-shirt on top of a large piece of cardboard just in case it needs to be moved before the paint is dry.)

Step 6: Write "Gran'dad is this many..." across the top of the t-shirt with a Sharpie. I knew I needed the space above the words for handprints, so I already had those placed before writing the words. Use a piece of paper, ruler, etc., to be a guide as you write.


Step 7: Figure out the placement of the handprints

and get started tracing the handprints. I traced the cardstock handprints and then replaced the (less exact) other handprints with the cardstock patterns before tracing. I lightly traced with a ball point pen during this step.

Step 8: Trace the handprints with the fabric paint. I am right handed, so I started at the top left corner and worked left to right and then down from there, kinda like a haphazard typewriter. Be careful to avoid where you have already painted.


These are the fabric paint pens I found at Michaels. They have lasted through both t-shirt projects, and were just as fresh this time as they were three years ago.


Step 9: Admire the finished product while the paint dries for 4+ hours:


Happy birthday, Dad/Gran'dad!

~~~~~

What are the grandparents known as in your family, either yours or your children's?

Saturday, February 27, 2010

A sewing project fit for a princess

After months of telling Grace to put real clothes on seeing Grace clip a baby blanket around her chest to create a long "dress," I decided something had to be done. She has dress up clothes; it's just that she thinks the skirts aren't long enough.

She wants to look like a princess. And princesses wear long dresses.

I looked around the house for some princess-worthy fabric, and the best I could do was some silky blue fabric with dragons on it. (Grace didn't mind. It seems like she said something about it looking like what the Little Mermaid would wear...)

I knew Grace loves "spinning dresses," so I made a pattern using newspaper to create three panels that would flare out at the hemline. (Three panels were as much as I could easily make with the bits of material I had on hand. I sew by hand, so this needs to be kept simple--no piecing together lots of pieces, thankyouverymuch.)

I pinned my pattern onto the fabric


and cut the fabric a little wider than the pattern because (1) I wanted to allow for the seams and (2) the pattern was a little shorter than Grace would like the finished dress to be anyway.


Shhh! Don't tell anyone, but I marked on the "wrong side" of the fabric with an ink pen. This is for dress-up clothes, remember...

I pinned the sides of the three panels together and sewed all the sides. Next, I wanted to run elastic across the top of the dress so I folded over and pinned the fabric for this. After I sewed this, I ran the elastic through. The safety pin is your friend with this step. It gives you something to hold onto while you pull the elastic through quite easily. I used baby elastic because that's what I had on hand.

Next, it's time for the first fitting! I had Grace try on the dress at this point to see how long the elastic needed to be around her to keep the dress up. She immediately accessorized. And twirled.


Then...my least favorite part of sewing projects: pinning the hemline. Ugh. But I managed to get the hemline pinned properly, all the while reminding myself that this dress was dress-up clothes (and therefore doesn't have to be perfect). That didn't stop me from repinning several times, but it made me feel better when I started hemming.

I wanted to add a simple strap to hold the dress up properly, knowing that with all of the spinning and flitting around that was sure to happen, Grace needed a little help to remain modest. :) I used one of the scraps of fabric and made a strap that would be a kind of halter-top style.

Again, the safety pin is your friend, both in turning the strap right-side out and in running elastic through.


The finished project (not ironed, because...did I mention this is only for dress-up?)


and the happy girl!


The dress was an immediate hit with Grace, and she typically wears it from the time she wakes up until I make her put on clothes every day. ;) Grace says she likes the colors of her new dress, and loves the "necklace" part. So far, she hasn't tried to wear it out of the house...so far...

~~~~~

Click here to enter to win 250 FREE custom stickers or labels! This giveaway ends March 2nd at 9:00 p.m.

Wednesday, January 21, 2009

WFMW: Crafty gift ideas

For this edition of Works for Me Wednesday, I thought I would share what we have been painting over the last month or so.


I wouldn't normally put red and purple together...well, except for here...but it's for a gift for another Red Hat Society member. :) I got the idea to use this verse after seeing it on a painted tile at Robin's website during BooMama's Christmas tour of homes. When I did the rough draft, "1 Thessalonians 5:16" fit perfectly along the bottom; finished product? Ummm...no.

I had a little better layout with the frame horizontally.


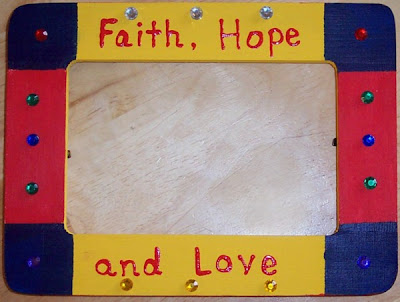
I let Josiah pick out a shorter the next verse. He painted the frame and also decided on the design, too. (I taped for straight lines, did the writing with the dimensional paint, and handled the sequins, but even the sequins are by his design.)


Josiah painted this one, too. I painted a base coat, then let him pick the colors and design he wanted to use. He originally wanted to do a camouflage design, but then thought better of it.


Robert designed, painted, and decorated this frame. This may be the only picture frame ever created with wiggly eyes...the same wiggly eyes that showed up here not too long ago.


The total cost was about $3 for each completed frame, and it is so easy to customize each frame to be personal. I had the sequins on hand (left over from another project), as well as the pack of a variety of colors of dimensional (fabric) paint, and only had to buy the frames ($1 each at Michaels) and embellishments ($2 for the dog theme pack, and $2 for a butterfly theme pack that has more pieces remaining). And that Works for Me! Check out Shannon at Rocks in My Dryer for more WFMW participants.
Related Posts Plugin for WordPress, Blogger...