Showing posts with label Works For Me Wednesday. Show all posts

Tuesday, December 10, 2013

WFMW: Sorting (Some) Laundry

I have two boys, and although they are ages 16 and 11, they wear the same size of socks as my husband and, without careful inspection (looking at the size on the tag) pretty much the same size of underwear, too.  Who wants to look at each of the tags?!?  Not me...especially now that it requires using my reading glasses...so this is what I do.

I used a Sharpie laundry marker to make a couple of dots on my oldest son's underwear inside the waistband.  I accidentally put two dots on the very first pair (I think I thought I was holding a smaller size...I really meant to have only one dot in his, but I messed up) so all of his underwear have two dots.  I put three dots on my youngest son's underwear.  When my oldest son outgrows his, I just add a dot and they are passed down to my youngest son.


Socks are a little easier to sort for my guys.  One wears only solid colored athletic socks (we won't comment on why...or who...), so his are easy to sort out from the pile of laundry.  My husband and other son, however, wear the exact same kinds of athletic socks.  I put one dot on the underside of the toes of my son's socks (both inside and outside, because I don't turn socks the "right" way as I fold) so I can easily tell which ones are his.


Really, there's no rhyme or reason to the number of dots on articles of clothing around here.  Maybe later...but not now.  

(Alternatively, I've heard of a couple of families who dump all the guys' (athletic) socks in one centrally located drawer/box for everyone to use.  This wouldn't work for our Mr. Only-Solid-Colors...or my husband, since there is also a young Mr. Looks-Like-He-Runs-Through-Mud-Without-Shoes in the mix.)
   
When life gets really hectic, I put each person's socks, unsorted, in a pile and they can either match them or dump them "as is" in the sock drawer.  Also, I usually buy the same kinds of socks over and over again (and we usually stick to only white socks), so when one sock gets a hole in it or goes missing, it's no big deal; there will be a match for it soon enough.  

And that works for me!   What works for you?  Share a tip of any kind or link to your blog post in the comments, and I'll check it out!   Click over to We Are THAT Family for more Works For Me Wednesday ideas.

Tuesday, November 19, 2013

WFMW: Homemade Bingo Games for Learning

Today I made a Bingo game for my kids to help them memorize the most common prepositions (which is how Easy Grammar Plus, a multi-grade level grammar curriculum we recently began using, starts out).  My oldest two (11th and 6th grades) are the ones who will need to memorize the prepositions right now, but I figured it wouldn't hurt for my youngest (2nd grade) to play along, too.  (The challenge will be getting my 11th grade son to play the game with us...but if he does, he will learn the most common prepositions the easiest way.)  

I looked online and found a list of prepositions that matched the list that Easy Grammar uses, and it already had each word in small blocks...perfect for the calling cards for a Bingo game.  I used Microsoft Publisher to create very simple Bingo cards with randomly placed prepositions, printed them on brightly colored (and already used on one side) paper, and this is how it all turned out:


When a player gets BINGO, he/she tells the other players a sentence using each of the prepositions in the row correctly.  Also, when I drew the prepositions from the pile of calling cards, I used each preposition in a sentence.  


Previously I made a Bingo game for learning how to tell time to five minutes using templates a teacher friend gave me:


Since the Time Bingo game was meant for a younger crowd, I printed the Bingo cards and calling cards on (already used on one side) card stock for durability.

Here's a close-up of one of the Bingo cards so you can see that each column has all the times that belong to either the 12, 3, 6, 8, or 10 o'clock hour.  I put Grace to work gluing on the small, randomly placed (except for the hour) clocks in each of the squares on each of the cards.


Many years ago, before I was so fancy with printing out Bingo cards on the computer, I made them by hand using cereal boxes for the cards and construction paper for the calling cards.  This set of cards is for number recognition--11 through 20--that I used when my oldest was little.  I drew a couple of "sample" calling cards on the envelope so I knew which set they belonged to.  (If I had it to do over again, I would have done 11-19 instead, assuming that 10 is readily recognized by the child.)


Here's the next set of cards I made way back when...for number recognition of the 20s.   I drew a couple of "sample" calling cards on the envelope so I knew which set they belonged to, too.  I didn't make a set for the 30s because by the time we played the 20s set, my son had the hang of number recognition.


These are the BINGO chips I made way back when...and still use now.  They are just pieces of construction paper and I keep them in an envelope.  If one (or a dozen) get lost, it's no big deal.


I keep all Bingo card sets together in one manila envelope so I only have to keep up with one set of Bingo chips.  Plus, I've found that sometimes one game of Bingo leads to wanting to play other Bingo games, so this keeps it all together for an easy transition.

And that works for me!  Click over to We Are THAT Family for more Works For Me Wednesday ideas.

Perhaps the best part of today was a few hours after I had played the preposition Bingo game for the first time with my youngest two children (6th and 2nd grades).  I had Josiah, my 6th grader, write down as many prepositions as he could remember; he remembered 16 today.  I thought I, too, would write down as many as I remembered; I remembered 20 today.  Grace, my 2nd grader, walked in the room, and I asked her if she remembered any prepositions from playing the game...she remembered 19. NINETEEN...and this was after possibly never having heard the term "preposition" before today.  She was tickled with these results, and I was, too.  :)

Wednesday, October 16, 2013

Works For Me Wednesday: Making Spice Mixes For Recipes Ahead of Time

For at least a year or two, I have measured out the spices I used in a specific chili recipe in two batches at a time...

once for the recipe I was preparing that evening, and once for a time in the future.  I labeled the second batch of spices with the name of the recipe (because I always think I will remember but...you know what happens) written on an empty spice container that I used for storing the mix over and over again.


Recently, in an effort to simplify things, as well as the realization that chili was off the menu on plenty of evenings if I didn't have the spices already measured out, I decided to mass produce the spice mix for my chili recipe.  


I used plastic food containers that I already had on hand.  I store these in a larger plastic food container that is now labeled "SPICE MIXES" so that the spice smells don't take over my pantry.  I plan on measuring out spices for another recipe, too, so I already labeled the bottoms of these little containers with a "C" for chili (along with a note stating which specific recipe these spices go with because...you know).

The process of measuring the spices into a series of containers all at once took a couple of minutes longer than measuring them for one use.  Chili will be back on the menu more often this winter, and I will expand this idea to other recipes for more time-savings...

And that works for me!  Click over to We Are THAT Family for more Works For Me Wednesday ideas.

If you are interested, here's the link to the chili recipe I use:  Laura's Quick Slow Cooker Turkey Chili.  I mostly follow the directions but have tweaked it to fit my family.  I am allergic to the beans listed in the recipe (I can eat great white northern beans and that's about it, and I only add one can instead of two), so that's one change I made.  I have never, ever made this recipe with tomato soup but always use some form of diced tomatoes, and I have not added red pepper flakes because I want my kids to eat the meal.  :)  Be sure to read the comments on the recipe to see what others have changed--you'll likely find what will work for your family in particular, too.  Even though the recipe is for a slow cooker, I usually prepare this on the stove top.

Wednesday, September 11, 2013

Works For Me Wednesday: "Be Ready" Morning List

This year, I made a "Be Ready" list for my younger two kids (ages 11 and 7).  It's posted in the kitchen as well as in their bedroom as a reminder of what they need to do to be ready to start school, as well as a reminder of what school work they can begin either together or on their own before I'm available. 

Because they still need to be reminded.  Every day.


* I added "Bed made" after taking this photo.  Every time they look at me blankly and ask, "What do I still need to do?" I count off these first 5 things on my fingers.  Maybe one day they will be able to look at their own fingers and remember 5 things, too. 

Until then, I can still refer my forgetful kiddos to the "Be Ready" list, and that works for me!

Check out We Are THAT Family for more Works For Me Wednesday posts.

Thursday, August 30, 2012

WFMW: Homeschool Organization

I've been looking around for some kind of inexpensive container that would work well with...well...containing each child's school books on a daily basis.  I know some families use plastic milk crates, but I knew that Josiah's box, in particular, would be a royal mess and we'd end up with damaged books, crumpled papers, a fussy mom, etc.  I was delighted when I saw these Sterilite Locker Crates for $4 each at Wal-mart!  They are essentially narrow milk crates with a solid bottom, and they are perfect for our needs. 


They come in a small variety of colors (Robert's, not shown, is red and is in his bedroom) and are stackable on the short end.


Grace (6) asked me why I needed a box.  Oh, how I laughed.


Grace packed her box full of any workbook she could find around here. She is an enthusiastic student.

I put a small piece of (bright orange) poster board in Josiah's box--at the start of the school day, all of his books are in front of the poster boardAs he completes a subject, he puts that book behind the poster board so he can clearly see what he still needs to finish.  (Otherwise, he will get up to go to the bathroom or to get water, return to find a closed book, and think he's somehow already finished everything when, in fact, he hasn't completed one subject.  Sigh...)

I have a small Ziploc bag in my box where I keep a few things so they will be handy throughout the day.  I occasionally use the die with the index cards as rapid addition, subtraction (on the reverse side of the card) or multiplication drill.  Since the die are kept in my bag, they don't sprout legs and run off.  (So far, at least.)


We typically use spiral notebooks for most subjects, but with two lefties (Josiah and Grace), I am moving towards using composition notebooks with them instead so the spiral wire is not in the way while writing.  (Plus, I've only seen the composition notebooks on sale for $.10 each this year, so I bought fewer spiral notebooks anyway.)  I'll still use the spiral notebooks with Robert.

This is where I store all the unused notebooks:  in a shoebox under my bed.  Fancy, huh?  If I leave them out in any other place (bookshelf, etc.), Grace writes in all of them.  I may have another author on my hands...


At the end of the school year, any partially unused notebooks are returned to the shoebox after tearing out the used pages.  In a pinch, partial is better than nothing.  :)

On an entirely different note, I have had the hardest time getting Josiah (10) to label his answers to math word problems.  Since it became a daily thing, I tried to keep it lighthearted as I questioned him..."Do you mean cookies?  bananas?  squirrels?"...and I always kept "squirrels" as one of the possible labels.  He finally picked up on this just this week, and this is what I found on his math page:


Cherries...not squirrels, mom  =)

Whoo hoo!  A labeled answer!  

And, yes, he wrote a sideways smiley face like he's seen on the computer.

A little bit of organizational improvement--and a little well-placed humor--works for me!


Check out We Are THAT Family for more Works For Me Wednesday posts.


Tuesday, June 26, 2012

WFMW: Homemade Laundry Detergent

I have been making my own laundry detergent for a while now...wanna see?

Here's what you'll need:
  • Hot water
  • 1 cup Arm & Hammer Washing Soda (not baking soda)
  • 1/2 cup Borax
  • 1 bar of soap (I used Fels-Naptha, which is a laundry soap and stronger soap than what you would bathe with)
These items can be found on the laundry aisle of most grocery stores, and usually they are on the top shelf.

Why, yes, I had already crumpled the empty wrapper before I thought to take the picture.

Grate the bar of soap.

I have asthma and grate the soap outside to minimize problems with the scent. I have far fewer problems with homemade laundry detergent than I do with store bought. However, I still have to make the laundry detergent on a day when I can have the windows open.

Add the soap shavings to a large saucepan with hot water (about 4 cups or more). Stir over medium-low heat until it dissolves and is melted completely.

Carefully pour the soap mixture into a 5 gallon bucket and add the 1 cup of washing soda and the 1/2 cup of Borax.  Add a few gallons of hot water, too, until the bucket is about half full.


Stir well until all powder is dissolved.


Fill the 5 gallon bucket with more hot water and mix well. 

Cover the bucket and let it sit overnight to gel.


I do not have a lid for our 5 gallon bucket, so I made one with plastic wrap and shoestrings. If I had a younger child or animals who might be in danger of falling into the soap, I would use an actual lid and/or move the bucket out of reach (for instance, on top of our freezer in the garage).

After the laundry detergent has cooled, it will have a strange, watery gel-like consistency--some have described it as looking like egg drop soup. Stir this well, and then you can leave the detergent in the 5 gallon bucket (be sure to stir before use) or transfer it to empty store bought laundry detergent bottles.

Use a handy-dandy scoop to transfer the detergent into smaller containers...a milk jug, of course.


Be sure to pull out the removable spout in the laundry detergent bottles to make filling the bottles much easier! The milk jug funnel will fit nicely and the spout is easy to replace on the laundry detergent bottle.

I do this step outside but forgot to take a picture at the time. Between the funnel and the scoop, filling your empty containers is a breeze even if you have no one to help you!


Here's where the recipes you find online differ dramatically--how much to use? I have seen everything from 1/4-cup to 1 cup per load. What works for me is to use 1/2-cup of this laundry detergent per load, mixing well before each use. However, I have had better results (and have seen other recipes that do this extra step) diluting it with half water and half detergent before using it and then using 1 cup of the diluted laundry detergent.

I don't have the space (or, obviously, a proper lid for the 5 gallon bucket) to keep the diluted detergent on hand, so I dilute it as I need to. I fill my storage detergent bottles with the undiluted detergent,

Storage containers


and dilute the detergent into another bottle that is ready to use. To make this step less problematic, I have my laundry detergent bottle marked at the halfway point to show how much detergent to pour into the bottle, and then a line marked at the top to show how much water to add. Measuring for this step ensures you don't have to measure every time you need to dilute the detergent. 

Pay no attention to the level of the detergent.  This is just to show the lines I've marked on the bottle.  :)

Shake well before using.  I use 1 cup of the diluted detergent per large load.  I measured and found that 1/2 cup of water mostly fills the cap of the laundry detergent bottle I use, so I use two capfuls.  For stains, I pour some of the laundry detergent directly onto the clothing and rub the detergent in a bit before adding the clothing to a load in the washing machine.  Fels Naptha is the original "stain stick," and I've found this to be very effective.

The washing soda and Borax last for a few batches of this laundry detergent, so a $1 bar of Fels Naptha is my only expense for the next few batches.  Inexpensive laundry detergent (and a scent that does not cause asthma symptoms for me)?  That works for me!


P.S.  To brighten your whites, since store bought laundry detergents have ingredients that do this step for you, add Oxi-Clean (follow the directions) or vinegar (during the rinse cycle) to the load.

    Saturday, June 23, 2012

    Shortening Swimsuit Straps


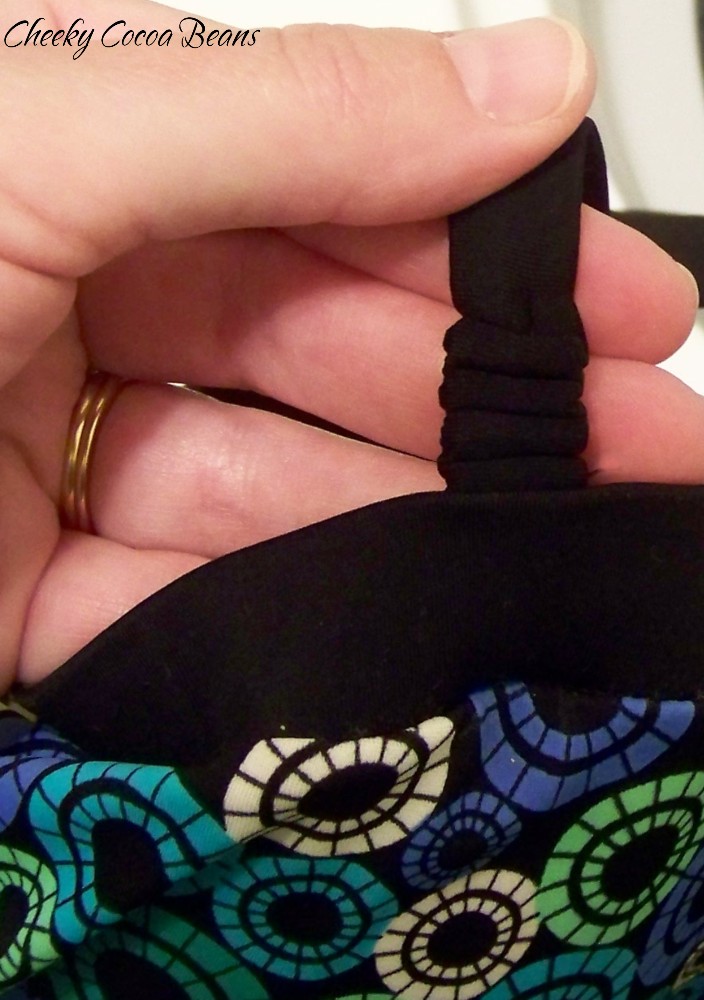
    I'm rather long-waisted; therefore, I almost always find a swimsuit that fits me in the torso but has droopy straps.  My solution?  Shorten the straps with a simple stitch.

    This is the finished product:


    Using a running stitch (also called straight stitch) with two strands of thread like this,


    sew through the strap that needs to be shortened (I only did the front straps on each side). 


    Sew a running stitch on both the right and left sides of one strap with two strands of thread, like these Photoshopped stitches in yellow (since black on black wouldn't show up very well):


    As I sewed along the right and left sides, I left a length of thread to work with (about 3 inches long) on each side.  Repeat the process on the other strap you want to shorten, and be sure to compare the lengths you have sewn before tightening either one.

    When you have sewn the length of strap that you think will work, tighten the two lengths of thread like you would a drawstring and make a knot in each length of thread (this is where using two strands of thread for the running stitch comes in very handy).

    Side view of the strap

    With that, you are finished, and your work adds a small decorative touch to your swimsuit. 


    This was a cheap, quick, and easy solution to an annoying problem, and that works for me!   (It's also very easy to undo if you need to change how you sewed the straps or if you don't like the results.)


    Click over to We Are THAT Family for more Works For Me Wednesday ideas.

    Tuesday, May 29, 2012

    Works For Me Wednesday: Homemade liquid hand soap...Take Two


    You may have already seen my other post about making homemade liquid hand soap. (If you're interested, you can click here to see it.)  Since that time, I have made another batch of liquid hand soap using a slightly different recipe, and I like the new batch a lot better.


    I think for these recipes for liquid hand soap, how your liquid soap turns out really depends on which bar soap you use.  If you have tried one recipe and did not like the results, play around with it a little longer (different recipe and/or different soap) before giving up!

    This time around, I used Ivory soap because we always have it on hand, I know I can tolerate it with my allergies to many fragrances,  and it's one of the cheaper soaps out there.

    This was the recipe I used, which is from the Raising Arrows blog:
    • 1 cup of soap shavings (I used Ivory soap)
    • 4 cups of  water
    • 1 Tablespoon of glycerin (I omitted this because I was using Ivory and the website said "regular soap" may not need it)

    Where do you find liquid glycerin?  The cheapest place I've found it around here has been at Hobby Lobby.  The glycerin (pictured on the right) was in the soap making section of the store and was priced at $3.47.  Remember to go to Hobby Lobby's website and print a coupon for 40% off!

    Add all ingredients to a pot and heat on your stovetop until the soap shavings have completely dissolved.  

    I should have taken a photo of the mixture at this point, because it looks really disappointing and you would probably think you've done something wrong.  My mixture at this point looked like water with yellow food coloring add to it.  That was it.  (It will look like soapy water with most soaps.)  I thought I had messed up something somehow, and thought I'd better add some glycerin to it because I had heard that would thicken the liquid soap some.  I added 1 tablespoon of glycerin; however, I'm not sure it made much difference and it turned out fine in the end.

    I set the pot outside, covered, and let it cool overnight.  This was how it looked after cooling and sitting overnight, after I'd stirred it a little:


    I used a hand mixer to blend the thickened soap to ensure a good consistency, since I'd had some complaints with my last batch (see note below)...


    and then used a really fancy funnel (a.k.a., an empty bottle from my last purchase of liquid hand soap, cut in half) to pour the soap mixture into my really fancy storage container (a.k.a., a well-rinsed milk jug).

    This funnel was a great improvement over the kitchen funnel I used last time.


    I doubled the recipe to make this amount of liquid hand soap.

    I really like the way this batch turned out!  This batch was a little thicker than my first batch, but not as thick as I thought it would have been since it didn't use nearly as much water.  Again, I really think the results depend on which bar soap you use as well as the amount of water called for in the recipe.

    NOTE:   Since this post, I have made this soap again several times.  Instead of letting it cool and thicken, I've poured the soap water mixture into my storage container.  It worked just fine--it was easier to pour into the storage container, I can use an empty Softsoap container for storage (which makes it much easier to refill my soap pumps!), and the consistency of the soap has been just fine.  I've also made the liquid hand soap without glycerin, as well as with less water, and the results have been good.


    Have you ever made liquid hand soap?  If so, which soap did you use, and did you like the results?

    Do you have any tips to share that work for you, whether it is about liquid hand soap or any other topic? 


    Related Posts Plugin for WordPress, Blogger...